Field Test of the Baader Maxbright II Binoviewer
By: William A. PaoliniDiscuss this article in the forums
May 21, 2020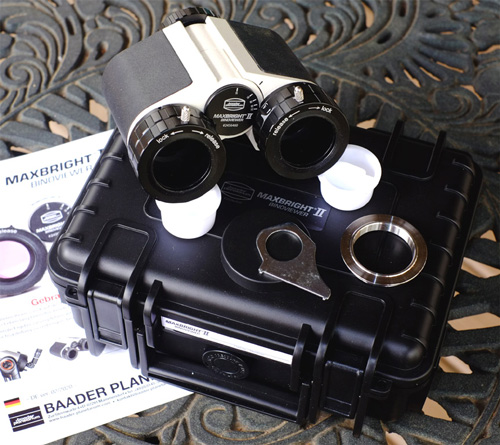 Fig 1: The Baader MaxBright II Binoviewer package. Note that the T2 Cap Nut Connector is attached and capped on the binoviewer in this image. Image Credit: Author.
1. Overview
The new Baader MaxBright II Binoviewer, successor to the discontinued MaxBright I, is marketed as a mid-tier binoviewer that fills the gap between more inexpensive entry-level binoviewers (Celestron, William Optics, Orion, etc.) and higher-end binoviewers (Baader Mark V Giant Binoviewer, DenkmeierBinotron 27, and others).
Some of the distinctive characteristics of this mid-tiered binoviewer offering, which the more inexpensive offerings typically do not provide, are:
- Ability to use maximum Field Stop 1.25" eyepieces, like 24mm 68° wide fields or 32mm 50° eyepieces, so the user can experience the maximum True Field of View (TFOV) that a 1.25" eyepiece can offer without showing any darkening near the field stop due to vignetting of the incoming light from the telescope by some component of the binoviewer.
- Well executed ergonomics that include self-centering ClickLock® eyepiece holders for rapid alignment and securing of the eyepieces (even those with a variety of undercut designs), and diopter mechanisms on the eyepiece holders that do not rotate the eyepiece as the eyepiece height is changed (this is essential for eyepieces using winged eyecups).
- The MaxBright II prisms have specially redesigned Phantom Group Multi-Coatings that are optimized for light transmission at frequencies that the human eye is most sensitive (green light) for brightest possible views.
- A design that is completely T2 compatible -- T2 is a physical inter-connection approach that was originally created by the optical manufacturer Tamron. It was later adopted as an industry standard for cameras and various other optical equipment.
- A wide variety of in-brand T2 optical accessories that can be interfaced to the binoviewer such as 1.25" Glass Path Correctors, 2" Glass Path Correctors, Correctors specifically designs for refractors or Schmidt Cassegrain (SCT) or Newtonian telescopes, multiple Mirror/Dielectric/Prism Diagonals, Flip Mirror Diagonal, quick-change bayonet connectors, extension tubes, and others.
- There is also a unique new MaxBright II accessory, called the Universal Alan Gee II Telecompressor (UAG II; part # 2454405). The UAG IIisdesigned for SCTs (including Celestron HD SCTs) and is tailored specifically for the MaxBright II allowing f/10 SCTs to get to f/5.9 while still reaching focus with the binoviewer.
A summary of the primary feature specifications of the MaxBright II are:
FEATURE SPECIFICATION Prisms & Coatings 27mm Prisms; 7-Layer Multi-Coatings that are Specially Optimized to the Sensitivity of the Human Eye (Green Light) Clear Aperture 26mm (Telescope-Side); 25.5mm (Eyepiece-Side) Eyepiece Holders Self-Centering Clicklock Clamps with Dual Diopter Adjustments Telescope Connectors T-2 Cap Nut (M 42 x 0.75) & Dovetail Ring (Zeiss Micro Bayonet); Spanner Tool Included to Mount Connectors Glass Path 110mm (measured as 117mm focuser travel with 1.25" nosepiece attached with same diagonal and eyepiece) Interpupillary Distance Variable from 2.1"- 3.0" or 53.5mm - 75mm (measured) Collimation Permanently Collimated (no accessibility to user) Construction Diecast Metal Housing and Connectors; Leatherette-Covered Thick-Walled ABS Thermoplastic Polymer Panels Permanently Affixed for Improved Grip and Shock Absorption Weight 21 Ounces (595 Grams) Included with Package ABS Foam-Lined Carry Case
MaxBright II Binoviewer with 3 End Caps
T2 Cap Nut Connector
Zeiss Micro Bayonet Connector
Spanner Wrench Tool
Instruction ManualTable 1 - Manufacturer supplied data (Author measurements shown in green text).For the complete list of features, as well as accessory information, the manufacturer's manual for this product can be found on the Baader Planetarium website at: https://www.baader-planetarium.com/en/downloads/dl/file/id/1614/product/4317/manual_baader_maxbrightr_ii_binoviewer.pdf.
2. Product Inspection and Impressions
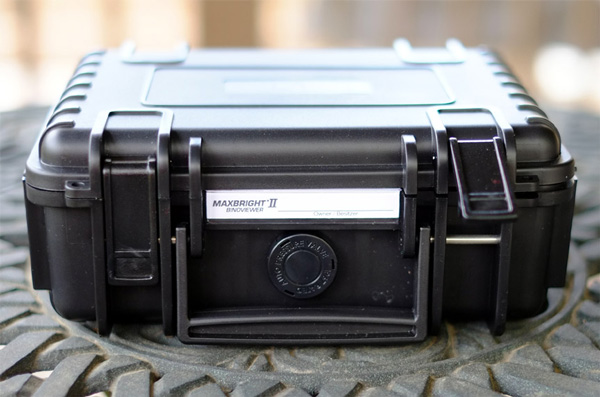 Fig 2: MaxBright II Binoviewer Hard-Shelled ABS Case (included). Note the metal pins used to hold the carry handle and secure the latches, clear plastic covered name plate for owner name/info, eyelets next to the latches for a small padlock, and the auto pressure adjustment valve on front to maintain equalized pressure between the inside and outside of the case during travel. Image Credit: Author.
Once I removed the Binoviewer package from its shipping box, I was immediately struck by the quality and ruggedness of the hard-shelled ABS case. I so much like these more practical cases to protect equipment rather than the typical aluminum or soft shell cases equipment sometimes comes with. The entire case looks and feels strong and very well made using thick ABS plastic and metal connector pins for added strength/longevity at key locations (handle, latches, and hinges). Another nice feature is the automatic pressure compensation valve on the front of the case (the circular feature in Fig. 3) to maintain equalized pressure between the interior and exterior of the case.
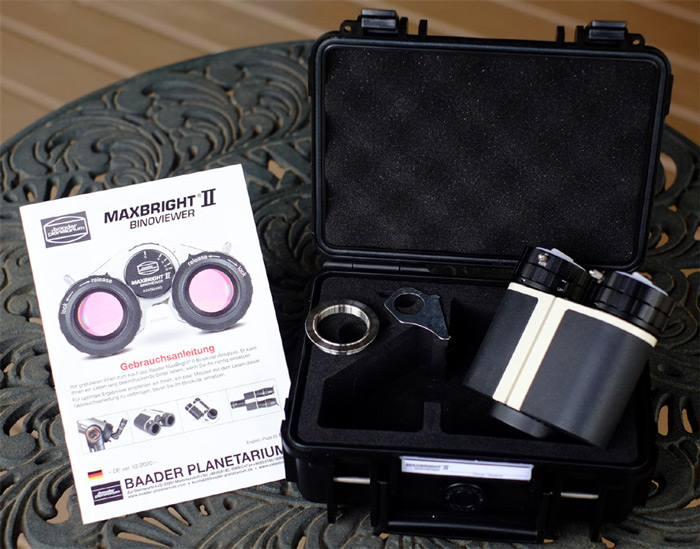 Fig 3: MaxBright II packaging with included items. Note that the T2 Cap Nut Connector is attached and capped on the telescope-side of the binoviewer while the alternate Zeiss Micro Bayonet Connector with spanner tool is shown not connected. The triangular cutout in the foam to the left of the binoviewer is designed to fit the optional Baader Zeiss 1.25" Prism Diagonal while attached to the binoviewer so the entire telescope-ready assembly can be stored in the case. Image Credit: Author.
On opening the case you find the lower section containing the binoviewer with the T2 Cap Nut Connector already attached, and the optional Zeiss Micro Bayonet Connector and Spanner Wrench Tool in slots in the foam cutouts. The lower part of the case is filled with a dense foam that is custom cut to fit the binoviewer, connector, and spanner tool. In addition, there is another large triangular cutout that is left unfilled. This cutout allows you to keep your Baader 1.25" T2 Prism Diagonal directly connected to the binoviewer so the entire assembly can fit directly into the case -- a nice touch as you can then store the entire assembly telescope-ready.
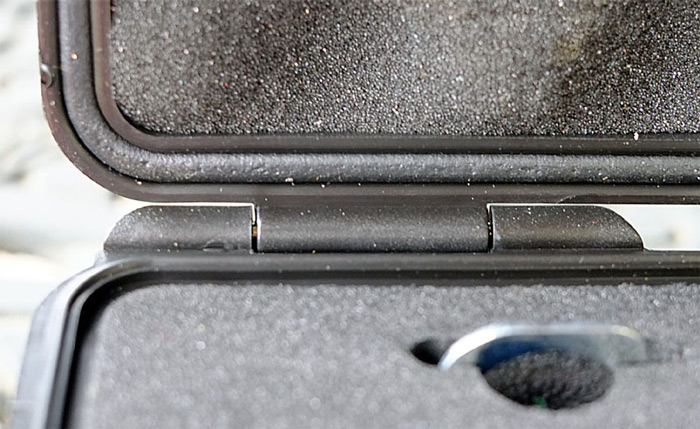 Fig 4: Close-up of the weather seal along the rim of the case's Image Credit: Author.
A close inspection of the ABS case's lid reveals a rubber-like material in the groove around the perimeter of the lid. When the lid is closed this material forms a weather resistent seal to keep the internal components safe from external elements. While the foam material in the lower section is dense and hard, the foam in the lid is soft and easily compressible.
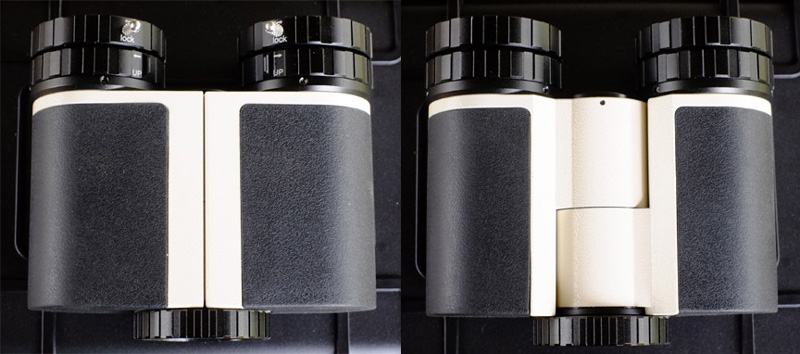 Fig 5: Top (left) and Bottom (right) views of the MaxBright II Binoviewer. Image Credit: Author.
Overall the MaxBright II binoviewer appears simple and elegant, without any unnecessary logos, graphics, or lettering. When handling the unit it feels sturdy, compact, and not overly heavy. Manufacturer specifications state that the MaxBright II weighs 21 Ounces (595 grams), or slightly heavier than typical lower-end binoviewers (Celestron, Orion, William Optics), and slightly lighter than higher-end binoviewers (Baader Mark V, DenkmeierBinotron). All mechanical functions are smooth and precise. The textured gloss white paint on the main body appears robust, as does the black leatherette grip panels which provide a firm high-friction feel.
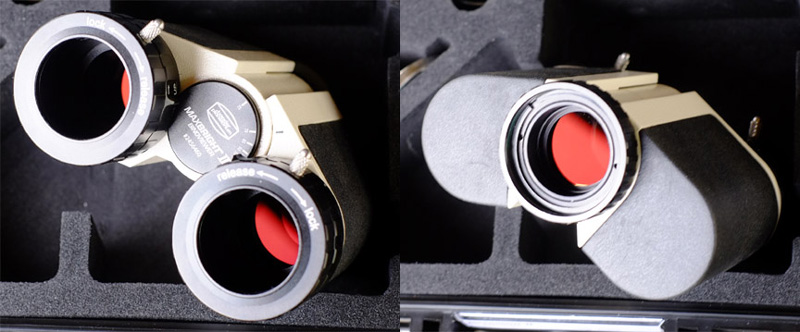 Fig 6: Eyepiece-side (left) and Telescope-Side (right) views. Note the reflex color of the prism -- a result of their designed optimization for highest transmission where the human eye is most sensitive (green light). Image Credit: Author.
Looking at the prism surfaces visible from the ClickLock Eyepiece Holders or from the T2 Cap Nut Connector of the MaxBright II, one can see that the reflected light from the 7-layer multi-coatings on the prism's optical surface (called reflex color). This color is not what is usually seen on astronomy equipment, which typically is anywhere from purple-blue for single coated optics to green for many multicoated optics. According to Baader Planetarium this more unusual color on the MaxBright II is the result of their specialized coatings that are specifically tuned to have the highest possible transmittance in the same spectrum where the human eye has its highest sensitivity (green light). This was done is an effort to make the MaxBright II's views as visually bright as possible.
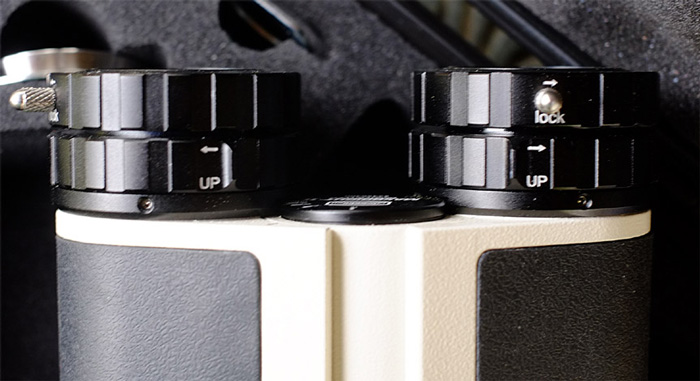 Fig 7: MaxBright II eyepiece holders with ClickLock (top) and Diopter adjustment (bottom) mechanisms.Image Credit: Author.
One of the most important mechanical attributes for a binoviewer, in my opinion, is the function and operation of the eyepiece holders. Paramount is that the holders seat and align the eyepieces precisely so that merging the two images is natural and automatic when looking through the binoviewer. Secondly, I find it frustrating to have to fiddle around in the dark looking for knobs to lock and release eyepieces, or to adjust their heights to accommodate either the slightly different focus points of each eye, or any slight difference in the Field Stop location of the two eyepieces being used. Any of these factors, even if very small, can affect the merging and matched focus of the images from the two eyepieces. On the MaxBright II, I was pleased to find that both functions, eyepiece lock/release and diopter height adjustment, were collocated on the same knob, and that each rotating collar performed their function smoothly and effortlessly so that the function could be performed by simply twisting the collar, regardless if the knobs were used or not. However, for those who prefer knobs, the diamond etched metal knobs for the ClickLock mechanism to lock/release the eyepieces are conveniently located where your forefinger naturally rests when grabbing the collar. Further, rather than the twist direction being the same for each eyepiece, they are designed to work by moving them both apart to lock, or both towards each other to release the eyepiece. I found this a much more intuitive and "scope-stable" approach as the two forces counteract each other, helping to not move the scope to one side as it would if both had to be rotated or pushed in the same direction.
Similarly, the diopter height adjustment (the lower collar of the eyepiece holder) also has a small protrusion to make it easier to rotate and tactilely distinctive from the lock/release. What I found most intriguing though on the diopter height adjustment is that the rotation of that collar did not rotate the eyepiece! With my William Optics Binoviewer the diopter height adjustment rotates the entire eyepiece assembly meaning that the lock/release screw changes location, and if using winged eyepieces on the eyepieces that they then become mis-positioned. The MaxBright II designers obviously did their homework and, I imagine, consulted real observersas their design has none of these issues.
 Fig 8: Baader 1.25x Glass Path Corrector (GPC) which can be inserted into the T2 Cap Nut on the telescope-end of the binoviewer (pictured). When a 2" nosepiece is then screwed into the T2 Cap Nut then GPC is held in place by the nosepiece contacting the flat place on the end of the GPC. If a 1.25" nosepiece is used then the GPC is screwed into the top of the 1.25" nosepiece prior to the nosepiece being screwed into the T2 Cap Nut. If the Baader 1.25" T2 Prism diagonal is direct connected to the T2 Cap Nut then the GPC is first screwed into the top of the diagonal.Image Credit: Author.
With my Williams Optics Binoviewer, I am used to screwing the Glass Path Corrector (GPC) onto the end of the 1.25" nosepiece, or inserting the binoviewer with 1.25" nosepiece into any standard Barlow. Doing the latter increases the magnification of the Barlow significantly due to the long light path of the binoviewer (e.g., the Tele Vue 2x produces 3.5x when the William Optics Binoviewer is inserted into it). However, once I take the 1.25" nosepiece off the William Optics Binoviewer and attach it directly to my Baader 1.25" Prism Diagonal using a generic after-market T2-M26 connector accessory, there is no longer a way to use the William Optics corrector or a Barlow with the binoviewer (*SEE NOTE BELOW). With the MaxBright II however, the Baader GPCs can still be used when the MaxBright is direct connected to the Baader 1.25" T2 Prism Diagonal as their GPCs can be screwed into the Baader T2 Prism Diagonal before the MaxBright II is direct connected to the diagonal. So unlike the William Optics, it is easy to use the MaxBright II without a GPC for widest possible TFOVs from your eyepieces, or with a GPC for higher magnifications even when direct connected to a diagonal. I also liked how the MaxBright II system has a variety of GPCs offering magnification factors as low as 1.25x and as high as 2.6x -- I find these make it easier than using a cadre of multiple Barlows that more often than not produce excessive magnification due to the extra light path of a binoviewer.
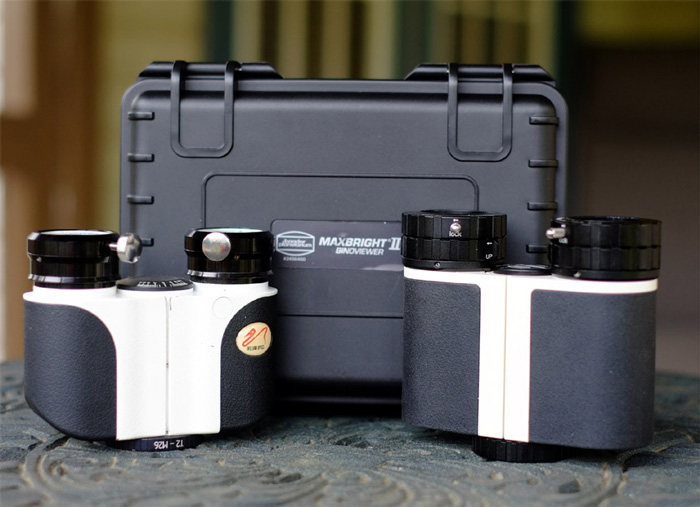 Fig 9: Size comparison between the WIlliam Optics (left) and BaaderMaxBright II (right) Binoviewers.
Note that the William Optics Binoviewer has its 1.25" nosepiece removed and replaced with a generic after-market T2-M26 connector allowing it to be direct connected to the Baader 1.25" T2 Prism Diagonal. Image Credit: Author.Finally, compared to my existing William Optics Binoviewer, the Maxbright II is very similar in size and weight making it more enjoyable for me to use on my refractors than larger units as I do not like adding significant unwieldy bulk or overly excessive weight to the observational side of the telescope.
*IMPORTANT NOTE: For users intending to remove the William Optics binoviewer nosepiece for use with Baader or other T2 diagonals, please note that models produced as of February 2020,William Optics has started gluing the 1.25" nosepiece to the body (to prevent frequent removals that strip the threads), and the nosepiece can no longer be unscrewed. If you have a WO binoviewer purchased before this time, the nosepiece should be removable. So please check your unit before you consider any configuration changes that require the removal of the nosepiece.
3. Field Observations
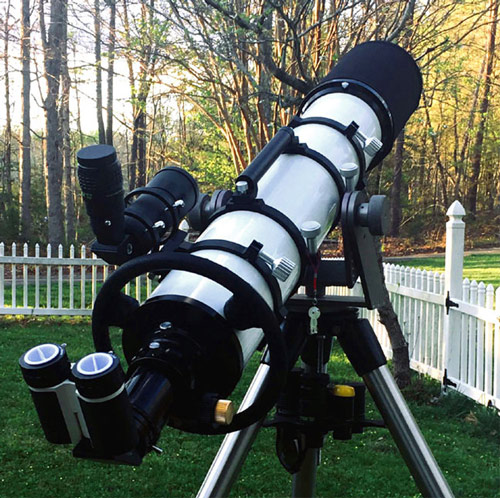 Fig 10: The MaxBright II Binoviewer connected to a Baader 1.25" Zeiss Prism Diagonal on a Lunt-152 ED Doublet f/7.9 Apo. Not pictured is a Takahashi TSA-102 f/8 Apo which was also used during the field testing.Image Credit: Author.
3.1 Location
Field testing was conducted for approximately 4+ weeks during March and April 2020 in forested rural Virginia (Yellow Zone) approximately 50 miles southwest of Washington, D.C. Sky Quality Meter readings at this location range between 20.5 to 21.2 mag/arcsec2 on moonless nights. Outdoor temperatures during field testing ranged from +35° to +65° F with humidity averaging 60%. Elevation of the observing site is approximately 300 feet above sea level.
3.2 Process
All outcomes are generally recorded at the time of occurrence at the telescope using a voice recorder. Each performance test is replicated multiple times, and often in multiple telescopes to ensure they are consistent and accurate. If there are any discrepancies or conflicting test results, then those tests are redone until the root cause of the initial discrepancy is eliminated. Any test related to assessment of perceived contrast, brightness, background Field of View (FOV) uniformity are only conducted under darkest conditions on moonless nights.
3.3 Equipment
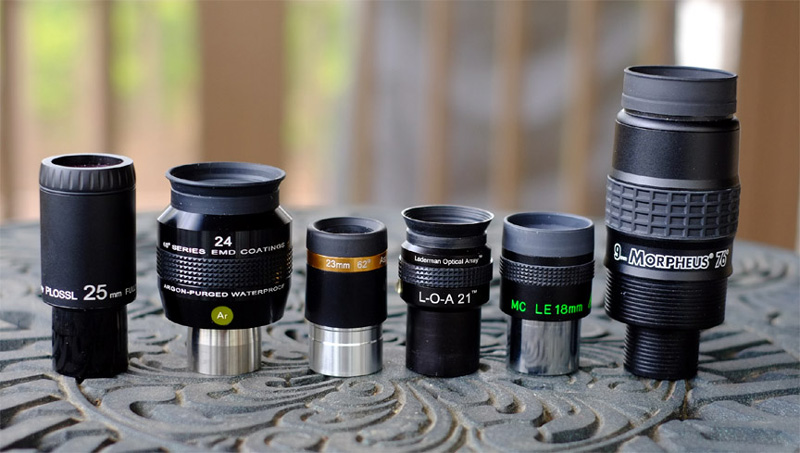 Fig 11: Eyepieces used in pairs for celestial object observations.Image Credit: Author.
Testing was accomplished in the Takahashi TSA-102 f/8 Triplet Super Apochromatic refractor and the Lunt-152 f/7.9 Doublet Apochromatic refractor. The diagonal used was the Baader Zeiss 1.25” T2 Prism Diagonal. Baader 1.25x and 1.7x Glass Path Correctors (GPC) were used to increase magnification as necessary. Eyepiece pairs used were: Sterling 25mm Plossls, Explore Scientific 24mm 68°s, unbranded 23mm 62° Aspherics, 3-D Astronomy 21mm L-O-A 21s, Takahashi 18mm LEs, and Baader 9mm Morpheus.
3.4 Celestial Objects
A range of different celestial object types were observed to assess the general performance of Baader MaxBright II Binoviewer. Objects observed included:
The Moon
Planet: Venus
Galaxy: M51/NGC5195
Galaxy: M81/82
Galaxy: M65/M66/NGC3628 (Leo Triplet)
Galaxy: M101
Multiple Star: Alpha Gem (Castor)
Multiple Star: Algieba (Gamma Leo)
Multiple Star: Iota Ori
Multiple Star: Meissa (Lambda Ori)
Multiple Star: Delta Ori (Mintaka)
Multiple Star: Beta Ori (Rigel)
Multiple Star: Sigma Ori/Struve 761
Multiple Star: Theta Ori (Trapezium)
Multiple Star: Zeta/80 UMa (Mizar/Alcor)
Nebula: M42Nebula: M43
Nebula: NGC 1973/1975/1977
Open Cluster: Collinder 70
Open Cluster: Melotte 111
Open Cluster: M37
Open Cluster: M38/NGC1907
Open Cluster: M44
Open Cluster: M48
Nebula: NGC 1973/1975/1977
Open Cluster: NGC1980
Open Cluster: NGC1981
Open Cluster: NGC2301
Supernova Remnant (SNR): M1
Star: Alpha Ori (Betelgeuse)
Star: Alpha Leo (Regulus)
Star: Alpha CMa (Sirius)3.5 Operational Assessments
After 4+ weeks of field testing during every clear evening, the following are my impressions of the BaaderMaxBright II Binoviewer for each of the listed performance categories:
3.5.1 Sharpness / Contrast / Transmission
Overall, I had an excellent impression of how crisp and defined, high contrast, and bright celestial objects were portrayed in the MaxBright II. I ran the binoviewers through a variety of celestial objects, and I compared the views through the MaxBright II to the William Optics binoviewer and to monoviewing though just the 1.25" prism diagonal. All comparisons yielded crisp and highly defined views with no readily perceivable differences to the optical characteristics of the views. In addition, when I scrutinized the views separately through each of the eyepieces on the MaxBright II, I did not notice any marked difference in the brightness from the left side vs. right side views. I was surprised by this since on the William Optics Binoviewer the two sides easily show views dissimilar in brightness, likely because the prisms do notequally split light to each side. So the MaxBright IIs evidently do a much improved job in this area.
Moving my sights to planets, I viewed Venus which was for me a breathtaking moment with the MaxBright II. I was using it on the TSA-102 with 1.7x (1.46x measured) GPC and 9mm Morpheus eyepieces. This arrangement yielded a 6.2mm effective focal length for approximately 132x magnification in the TSA-102. Venus' crescent shape was rendered razor sharp, both limb and terminator. Venus also appeared visually large as well, even though only at 132x magnification. While the planet was still bright, the 0.77mm exit pupil from this configuration sufficiently mitigated the brightness of the orb so that I was actually able to observe some small albedo differences in Venus' atmosphere (a relatively rare occurrence for me). As a result of this planetary experience I am now very much looking forward to binoviewing the 2020 Mars opposition!
While 132x for planetary observing may not sound like a lot of magnification, I am used to critical observing at these lower magnifications since I conduct most of my planetary observing with the TSA-102 at 136x, which is what my 6mm ZAO-II eyepiece produces in that scope. While the image scale might be considered small, all the detail produced by the 4” main objective is still well discernable by the human eye's resolution at that magnification level. And you will often hear anecdotal accounts of how images seem visually larger when binoviewed vs. monoviewed. When I took my first look at Venus through the MaxBright II, I had this same reaction as Venus was so much larger than I had expected from 132x magnification. It was quite a memorable view!
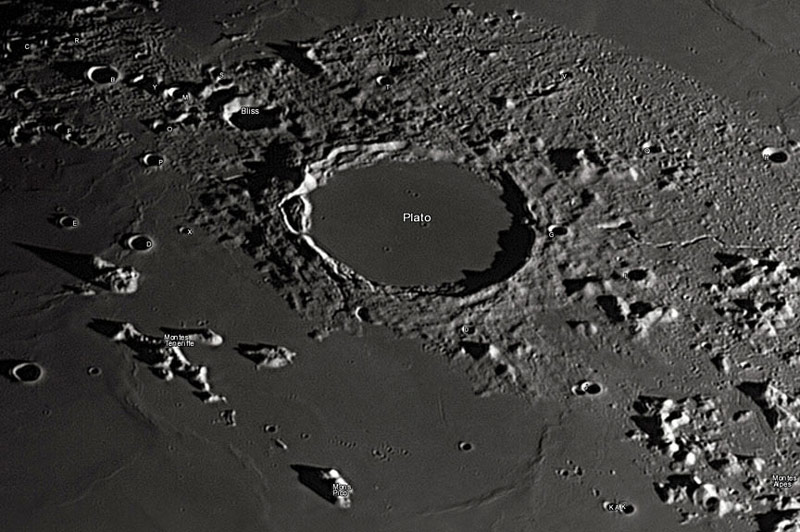 Fig 12: Plato lunar crater as seen from Earth with satellite craters labeled. Montes Teneriffe is the arrow-shaped complex located in lower left of the image between the lower rim of Plato and the small crater on the far left edge of image frame. Credit: David Campbell - Meade LX200 14" and LumeneraSkynyx 2-1 at the University of Hertfordshire's Bayfordbury Observatory (Image cropped; Public Domain)
Moving to the Moon, using that same eyepiece and GPC configuration, both the TSA-102 (132x) and Lunt-152 (195x) provided views of the lunar terrain that was highly etched and richly contrasted. While moving across maria (Mare Serenitatis and the Taurus–Littrow Valley around Crater Clerkeare favorites), through crater floors, along rilles, through lava flows, and over mountains, the one feature during observing sessions that I particularly enjoyed was Montes Teneriffe, especially when the lunar terminator was near. This solitary mountain complex rises from the surrounding smooth floor of Mare Imbrium, just south of Crater Plato. When I am on this feature I always enjoy pumping up the magnification when the seeing is steady to pick out the various surface features on these mountains. When binoviewing it is a much more pleasant experience because using two eyes at once is natural and less fatiguing compared to single-eye viewing, so I am able to linger much longer on target comfortably.
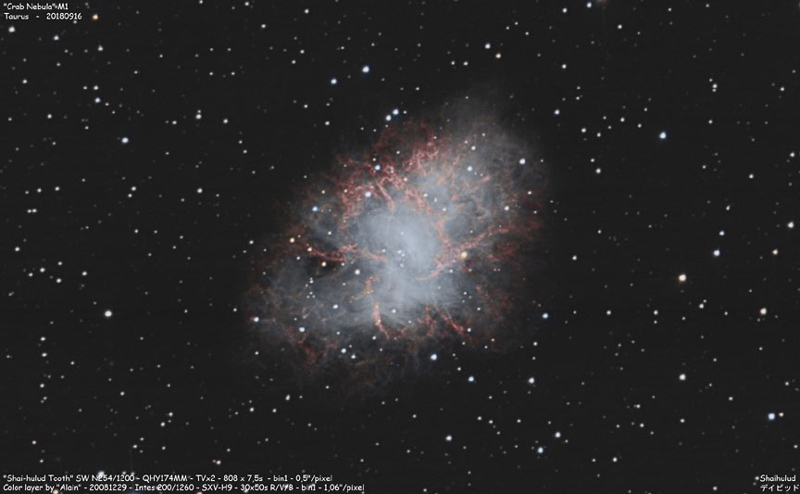 Fig 13: Messier 1 (M1/NGC 1952), The Crab Nebula (Supernova Remnant), located in the constellation Taurus. Image Credit: Shaihulud D. D. / CC BY-SA (https://creativecommons.org/licenses/by-sa/4.0) Original image without alterations.
I typically only view galaxies and dimmer nebula or supernova remnants (SNR) while monoviewing. In the past I've found binoviewing these DSO less than satisfying using my William Optics Binoviewer. However, my opinion has now changed using the MaxBright II. I think this is primarily because of how precisely the mechanics performed and how the ergonomics of its operation was such that the unit really got out of the way so my attention could be focused entirely on the objects being observed instead of the equipment. However, I did notice when switching back and forth between the William Optics and the MaxBright II in the Lunt-152 Apo that the view of dimmer DSO, like M1 (the Crab Nebula SNR), appeared slightly large and a little more detailed. Using the William Optics I could easily see M1, however I could not make its exact shape/orientation well, nor see any changes in brightness across its surface. With the MaxBright II the oblong shape, orientation of that shape, and subtle regions of brighter and darker areas in the nebula were all readily detectable.
Similarly to my experience with M1, the Pinwheel Galaxy M101 also showed slightly better in the MaxBright II compared to the William Optics, with the spiral arms of this large low surface brightness galaxy subtly popping into and out of view with adverted vision using the Lunt-152 Apo. Moving to M81/M82 in Ursa Major, M81 showed quite brightly with a well defined core and a rather large extent to the halo around it that are its arms. I could not discern distinct arms but was surprised at how far they extended compared to my recollection on previous nights of monoviewing. M82 in the MaxBright II showed very brightly and detailed with multiple knots of brighter and darker areas across its surface.
Finally, turning the Constellation Leo and the Leo Triplet galaxies, and after pointing the Lunt-152 to their approximate location, when I peered into the eyepieces I was pleasantly surprised to see that I was square on-target with all three members of this triplet positioned together in the FOV. M65 and M66 both showed very bright cores and good extent and shape to the dimmer halo of their spiral arms. NGC3628, although much dimmer in comparison, showed larger with a well-defined rectangular shape wider at the ends than at center. Overall I was very pleased with the rendition of these beautiful galaxies approximately 35 million light years distant.
3.5.2 Scatter / Stray Light Suppression
At no time during any observation, from the Moon to bright stars like Sirius to bright planets like Venus did I note any stray light artifact from the MaxBright II. The FOV backgrounds appeared consistently rich with no more apparent scatter around stars or planets than I am used to from the eyepieces being used. However, living in the Northeast United States, where the local climate is rich in humidity and atmospheric water vapor, most of the time scatter from these atmospheric sources will overwhelm anything coming from the components in the optical chain of the telescope. Therefore, relative to scatter, a more valid assessment would need to be done from a higher altitude dry location rather than my current 60%+ humidity sea-level observing site.
3.5.3 Field of View
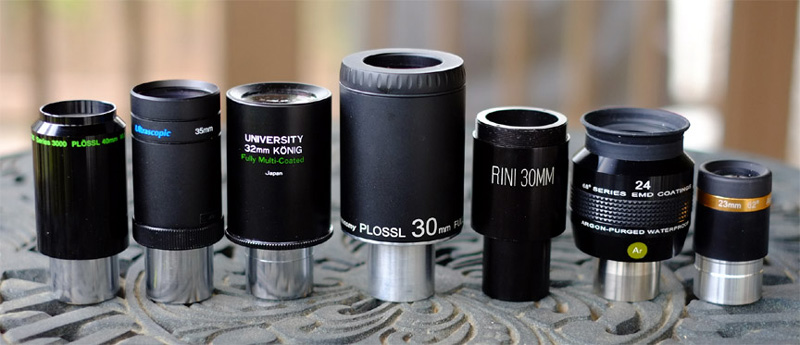 Fig 14: Eyepieces with Field Stops producing widest True Field of View (TFOV) used singly for Vignette tests. From left-to-right: Meade 3000 40mm Plossl, Orion 35mm Ultrascopic, University Optics 32mm König, Sterling 30mm Plossl (with custom made 1.25" barrel), Rini 30mm Plossl, Explore Scientific 24mm 68°, and Unbranded 23mm 62° Aspheric. Image Credit: Author.
To assess whether the 25.5mm eyepiece-side clear aperture of the MaxBright II would show any readily discernable dimming around the periphery of the FOV when using eyepieces with Field Stops (FS) larger than 25.5mm, I selected an array of single eyepieces to test in one of the eyepiece ports of the MaxBright II. These eyepieces were: Meade 3000 40mm Plossl, Orion 35mm Ultrascopic, University Optics 32mm König, customized Sterling 30mm Plossl, Rini 30mm Plossl, Explore Scientific 24mm 68°, and Unbranded 23mm 62° Aspheric. All these eyepieces, have Field Stops at or near 27mm, except for the Orion 35mm Ultrascopic and University Optics 32mm König, both of which have Field Stops near 29mm.
With the larger 29mm Field Stop of the Orion 35mm Ultrascopic and University Optics 32mm König, darkening of the FOV was very apparent prior to the Field Stop through each eyepiece. While the darkening caused by the vignetting of their 29mm Field Stop by the smaller 25.5mm eyepiece side clear aperture on the MaxBright II was obvious, it was mild enough to allow the Field Stop edge itself remain sharp in the view. The dimming was nevertheless noticeable enough to be distracting. However, all of the eyepieces with the 27mm Field Stops showed nicely illuminated views from center to edge through the MaxBright II, with no readily perceived darkening near the Field Stop. Even the dimmest stars remained visible in the FOV when moved adjacent to the Field Stops in these eyepieces. So for all of us who use the venerable 24mm Tele Vue Panoptic or the 24mm Explore Scientific 68° or a general purpose 30-32mm Plossl to obtain the largest TFOV with a 1.25" eyepiece, the MaxBright II Binoviewer will provide a nicely illuminated view edge to edge. My William Optics Binoviewer on the other hand, with its smaller 20-22mm clear aperture, shows severe vignetting with these same eyepieces.
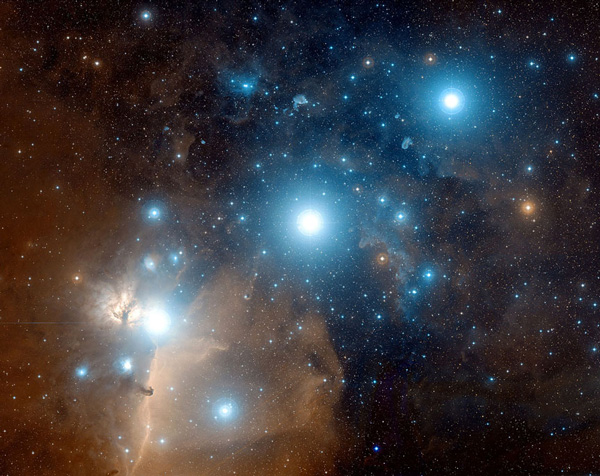 Fig 15: Orion’s Belt (Open Cluster Collinder 70). Observing the ring of fainter stars around the central star (Alnilam) of Orion's Belt; a favorite of mine and easily achievable with the TSA-102 Apo when binoviewing without a GPC on the MaxBright II Binoviewer. Image Credit: Davide De Martin & the ESA/ESO/NASA Photoshop FITS Liberator.
Since I can use my 24mm Explore Scientific 68° eyepieces in the MaxBright II Binoviewer without using a GPC, I can now enjoy much wider binoviewed TFOVs using my Apos, especially the TSA-102. I can now easily take inbinoviews of large-field favorites of mine like the central star of Orion's Belt (Alnilam) together with the loose ring of prominent stars that magnificently surround it. Similarly, when turning to M42 I can now enjoy getting the entire Sword of Orion when using the MaxBright IIs, from the open cluster NGC1981 just above 42 Ori to the Iota complex of stars at the tip of the Sword, all gloriously rendered in the same FOV.
During many of the field testing sessions I revisited some of the really nice open clusters that were positioned well including: Melotte 111 (Leo's Tuft), M37, M38+NGC1907, M44 (Beehive), M48, and NGC2301. Open clusters are a real treat to observe with binoviewers as they often take on a very dimensional character that does not occur when viewing with just one eyepiece. Of these Melotte 111, officially named the Coma Star Cluster, is quite large and impressive, perfect for an eyepiece with a wide TFOV. While this open cluster is in Coma Berenices, since the cluster was "appropriated" out of Leo by Ptolemy III I don't refer to it as the Coma Star Cluster but what it more rightfully is, Leo's Tuft Cluster! Also a favorite when binoviewingduring testing was M38 and the nearby cluster NGC1907often overlooked by observers. This cluster is faint and small, but very mysterious and ethereal looking next to the much grander M38. Finally, when scanning the skies with the MaxBright II loaded with 25mm Sterling Plossls, I discovered a new-to-me cluster, NGC2301. This cluster, also a Herschel 400 target, I found to be quite an unexpected treat with a loose elongated shape that was quite beautiful to observe.
3.5.4 Mechanical Operation / Ergonomics
For me, the ergonomics of a piece of equipment can often make or break how I feel about it. If operational characteristics in the field are clunky or problematic in a way that diverts my attention from the observing, then I am not very likely to use that equipment very often, regardless of how well it performs optically. As mentioned above, the MaxBright IIbinoviewers performed very well optically. They were also a delight to use because of their mechanical design.
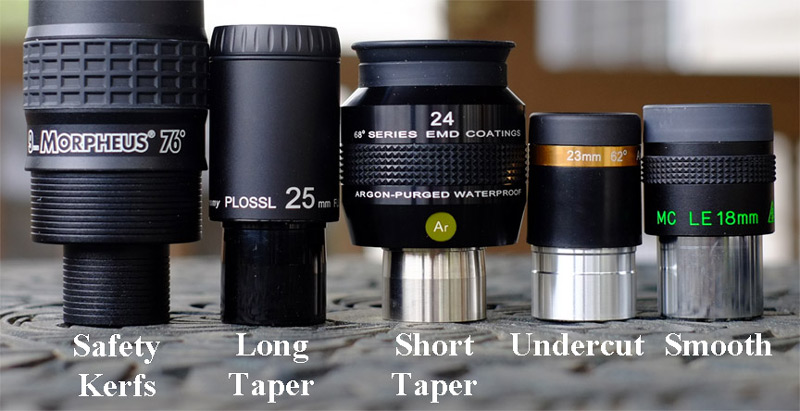 Fig 16: Barrel types tested for proper seating/alignment with the MaxBright II ClickLock eyepiece holders. Image Credit: Author.
Of particular note was how effortlessly the MaxBright II ClickLock eyepiece holders secure the eyepieces perfectly aligned. Regardless of the undercut style of the eyepieces, these holders always secured them in perfect alignment so I saw merged images through both eyes the first time and every time! And even better, for those eyepieces with the dreaded undercut barrels, these never once got stuck or hung on the eyepiece holder when inserting or removing the eyepiece. Of the many different eyepiece holders I have on my several telescopes and telescope accessories, this was the first time for me that undercut eyepieces have not been a problem.
I also found that using the ClickLock mechanism to secure the eyepieces was much easier and quicker than the traditional set screw / compression ring. So rather than having to locate the set screw then turn it several times, with the ClickLock you just grab the diamond cut metal posts that are always positioned on the same side of the eyepiece barrels, and pull them away from each other a short distance to secure the eyepiece. Grabbing them both and pushing them toward each other then unlocks the eyepiece, a very fast and intuitive process, and welcome change from entry-level binoviewers like William Optics. And when I needed to adjust the diopter focus of either eyepiece, when the lower adjustment collar on the eyepiece holder is rotated, it raises or lowers the eyepiece holder without rotating any other part of the holder or the eyepiece! So my eyepieces with winged eyeguards maintained their seated orientation throughout any adjustments unlike the case with entry-level binoviewers (which, to be fair, are about half the price of the MaxBright II units).
At the telescope-end of the binoviewer, using the supplied T2 Cap Nut to directly connect the binoviewer to a T2 compatible diagonal instead of using a 1.25" or 2" nosepiece worked quite well. Unlike the William Optics and other simpler binoviewers, the MaxBright II connector allows you to easily rotate the binoviewer body to a convenient orientation. And to unscrew the binoviewer from the diagonal does not require rotation of the entire binoviewer. Instead, with the MaxBright II you can maintain a fixed orientation of the binoviewer while you rotate just the T2 Cap Nut only to disconnect it from the diagonal -- overall a much more pleasant experience. However, I did find that if I left the MaxBright II Binoviewer attached to the telescope, and it had heavier eyepieces in it when I was unscrewing it from the T2 diagonal, the additional pressure on the threads from this extra weight would often add enough friction to the threads to make it difficult to unscrew. When that occurred I found it was more expedient to either remove the eyepieces from the binoviewer to lighten the assembly or simply remove the diagonal and binoviewer from the telescope and then disconnect the units.
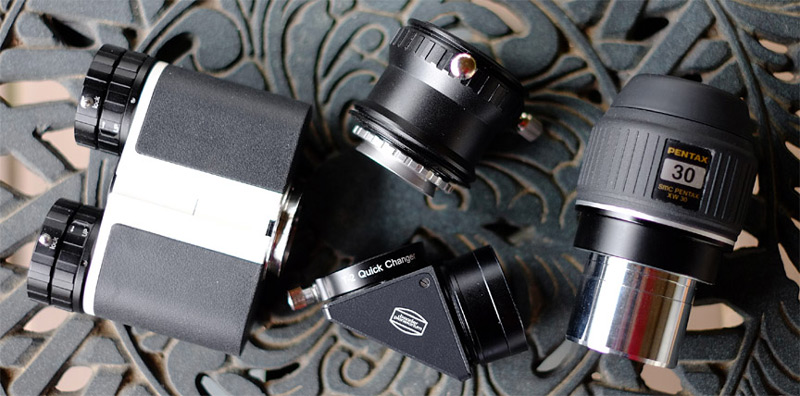 Fig 17: BaaderMaxBright II Binoviewer configured with included Zeiss Micro Bayonet (left), 2" eyepiece holder with Baader T-2 Quick Change Ring # T2-07 2456320 (top center), Baader Zeiss T2 1.25" Prism Diagonal with Baader Heavy Duty T-2 Quick Changer #2456313A (bottom center), and Pentax 30mm XW eyepiece (right). Image Credit: Author.
There was a solution to the above problem, however: the Zeiss Micro Bayonet Connector included withthe MaxBright II package. Removing the T2 Cap Nut Connector from the binoviewer and replacing it with the Zeiss Micro Bayonet Connector, then installing a BaaderHeavy Duty T-2 Quick Changer(not included) onto the top of the 1.25" T2 Prism Diagonal, now allowed effortless removal of the binoviewer from the diagonal while still attached to the telescope. And this new connection approach only adds 2mm to the light path compared to using the T2 Cap Nut Connector.
My observing preference is being able to switch between binoviewing and monoviewing with a 2" Pentax 30mm XW eyepiece when the object being observed is too large for a 1.25" eyepiece. To accomplish this process easily I added a Baader T-2 Quick Change Ring to my 2" eyepiece holder for the 1.25" T2 Prism Diagonal so I could then effortlessly switch between using either the MaxBright II or a 2" eyepiece holder on the T2 Diagonal. Since the Baader Zeiss T2 1.25" Diagonal has a relatively large 34mm clear aperture it can handle 2" wide fields like my Pentax 30mm XW eyepiece without any obvious vignetting of the FOV.
Overall, the well-thought-out ergonomics of component operation on the BaaderMaxBright II Binoviewer made them both enjoyable and effortless in field use. Since getting them, I now actually look forward to binoviewing more than monoviewing and plan to keep them permanently attached to my Lunt-152 Apo as its wide field binoviews of open clusters and rich star fields when not using a GPC are spectacular and mesmerizing, as are the higher magnification views of the Moon and planets.
4. Summary Impressions
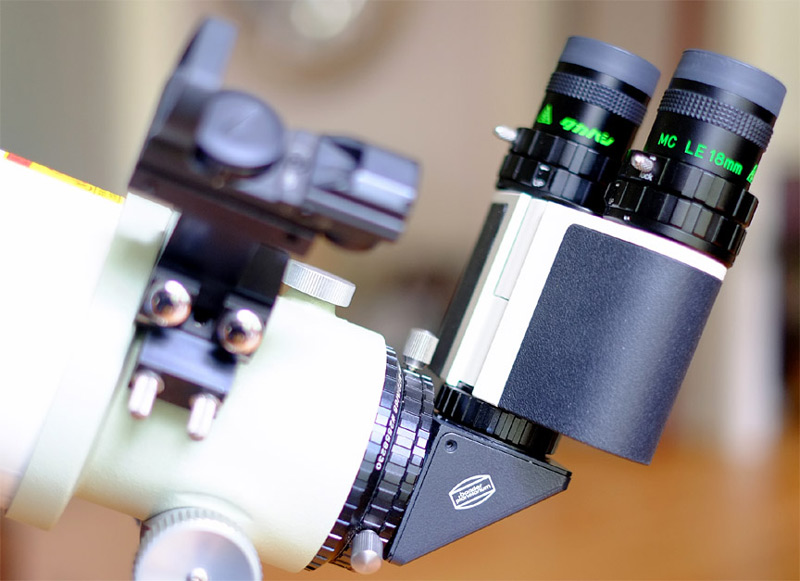 Fig 18: BaaderMaxBright II Binoviewers with Takahashi 18mm LE eyepieces on the Takahashi TSA-102. Image Credit: Author.
Overall, using the MaxBright II Binovewer has been a transformative experience for me. I have been binoviewing with my telescopes for well over a decade, but the experience has never been what I would call a pleasant one due to the myriad of quirks I find when using the William Optics Binoviewers. However, with the MaxBright II Binoviewer all the issues I previously encountered are now fully resolved, making my experience binoviewing entirely enjoyablefor the first time. Over the 4+ weeks of testing the components of the MaxBright II system performed flawlessly and provided me with many memorable views of rich star fields, open clusters, double stars, galaxies, nebulae, supernova remnants, the Moon and Venus. The compact size, moderate weight, solid build quality, precise mechanical function, well thought out ergonomics, plethora of available accessories, and excellent optical performance has actually made me a fan of binoviewing again!And interfacing the MaxBright II Binoviewer to the diagonal gives the MaxBright II a wonderful system-ready flexibility and adaptability to handle most any observing situation. The performance, ease of operation, and flexibility of the MaxBright II Binoviewer provided for me seamlessly executed and thoroughly rewarding observing experiences, whether using low power 1.25" eyepieces for sweeping wide field vistas, to those higher-power eyepiece for detailed lunar and planetary observations. Very highly recommended!
See the configurations of the Baader MaxBright II binoviewer at this link.
 About the Author
William "Bill" Paolini has been actively involved in optics and amateur astronomy for more than 50 years, is author of the desk reference on astronomical eyepieces: Choosing and Using Astronomical Eyepieces which is part of the Patrick Moore Practical Astronomy Series published by Springer of New York, has published numerous product reviews on major online amateur astronomy boards, and has worked as a tour guide volunteer for the United States Naval Observatory's historic 1873 26" and 12" Alvan Graham Clark refractors.
Bill's professional background is as an officer in the U.S. Air Force and as a computer scientist, holding a Bachelor’s degree in Computer Science and a Master of Science in Education. He has worked for the U.S. Department of Defense, the U.S. Department of Commerce / Census Bureau, the Federal Trade Commission, the Federal Reserve, the World Bank, and a variety of commercial corporations in the information technology, information technology security, and telecommunications industries.
Bill has been observing as an amateur astronomer since the mid-1960's, grinding mirrors for homemade Newtonian telescopes during the 1970's and eventually owning, using, and testing over 400 eyepieces in a wide variety of telescopes including Achromatic Refractive, Apochromatic Refractive, Newtonian, Maksutov-Cassegrain, and Schmidt-Cassegrain optical designs. Today he enjoys observing from his rural home an hour's drive southwest of Washington, D.C., where his primary amateur astronomy pursuits are lunar, planetary, bright nebula, open cluster, globular cluster, and double star observing.
***
This article is © William Paolini 2020. All rights reserved. Images © William Paolini 2018. For permission to use images, contact the author at wapaolini@hotmail.com.
Please login or register to watch, comment, or like this article.
-
Final Announcement: We're Saying Goodbye to AstronomyConnect. Read Our Closing Notice.
Dismiss Notice
New Cookie Policy
On May 24, 2018, we published revised versions of our Terms and Rules and Cookie Policy. Your use of AstronomyConnect.com’s services is subject to these revised terms.